How to Gather Eastern Oysters
A beginner-friendly guide to hand-picking wild Eastern oysters off intertidal reefs at low tide, with a hard focus on the biotoxin and bacteria risks that make oyster safety non-negotiable.
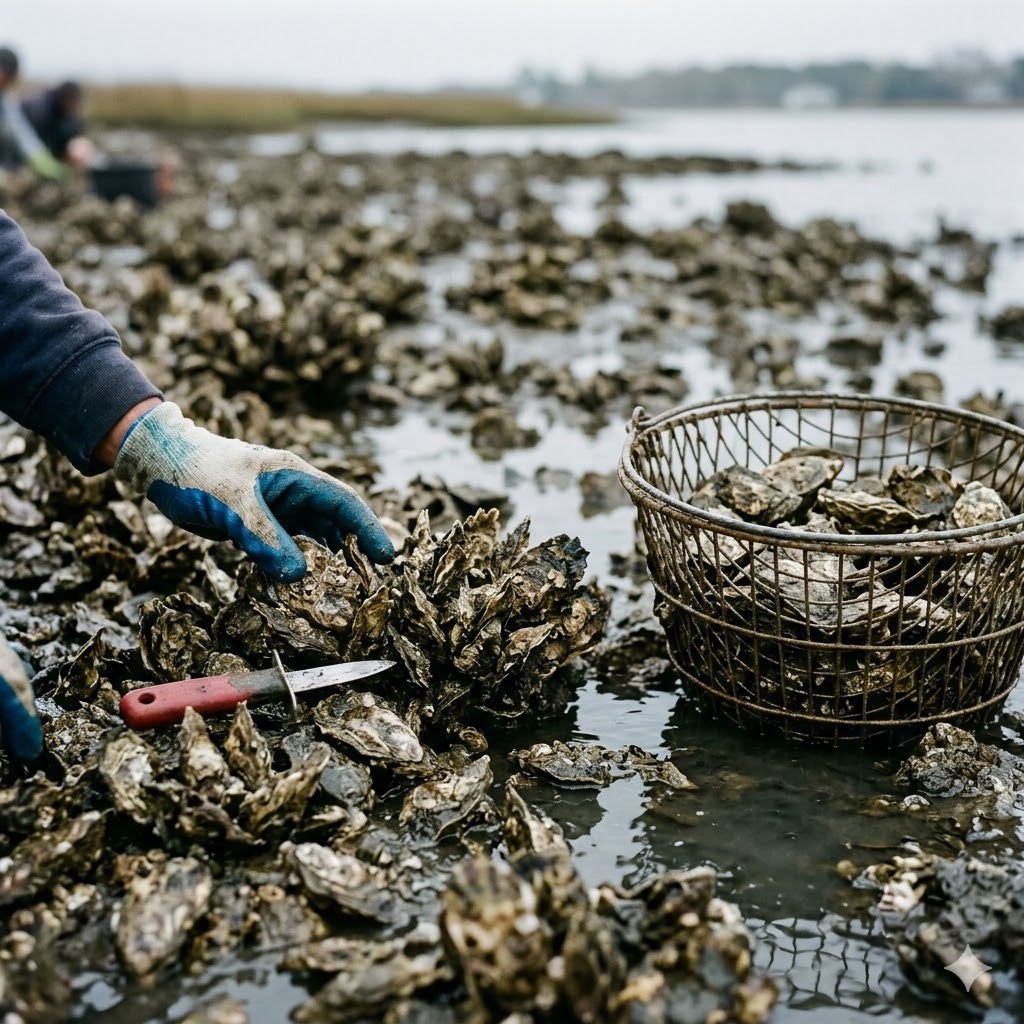
🔴 Oysters filter huge volumes of water, so ONLY take from approved, open waters and never during red-tide/Vibrio advisories. Raw oysters from warm or closed water can be dangerous - when in doubt, cook them.
The Eastern oyster is one of the most rewarding shellfish you can gather by hand, and one of the most dangerous to get wrong. On the right stretch of coast at the right stage of the tide, you can walk out onto a reef that has been building for decades and pick a meal off the rocks with nothing more than a glove, a knife and a bucket. It is close to free, it is genuinely good eating, and it is one of the few wild harvests where a total beginner can succeed on the first try.
That accessibility is also the trap. Oysters are filter feeders that pump huge volumes of seawater through their bodies every day, and whatever is in that water ends up concentrated inside the shell. That means an oyster from clean, officially approved water is a treat, and an oyster from closed or polluted water can put you in hospital. This guide covers where to find them, how to gather and cull responsibly, and how to shuck, cook and eat them - but the section that matters most is the last one, on safety and the law. Read it before you ever put an oyster in your mouth.
Why go for Eastern oysters
Eastern oysters cluster in the intertidal zone, which means that on a good low tide you do not need a boat, a dredge or any expensive kit. You wade or walk out, and the oysters are right there, cemented to rock, to old shell, and to each other. For anyone starting out in shellfish gathering, that low barrier to entry is the whole appeal.
They are also excellent food. Wild Eastern oysters have a briny, mineral, distinctly "of the sea" flavour that many people prefer to farmed. Eaten raw on the half-shell from clean water they are a delicacy; grilled, baked, fried or dropped into a chowder they are forgiving and delicious. A single productive reef can, tide after tide, keep providing if you harvest it gently.
Gathering them well also makes you a better steward of the reef. Oyster reefs are living structures that filter water, buffer shorelines and shelter fish and crabs. Learning to cull singles, leave the young, and never strip a bar teaches the same habits that keep the resource there for next season. For more on how the gathering fits alongside other shore work, see the wider Shellfish and Crustaceans section.
Where and when to find them
Eastern oysters like brackish water - the mix of salt and fresh you find in estuaries, tidal creeks, river mouths and behind barrier islands. Look for firm intertidal reefs and bars that are exposed at low water: raised clumps of shell and rock, often greyish and crusted, that stay put while softer mud drains around them. Where you see one oyster cemented down, you will usually find a cluster.
Timing is everything, and the tide is your calendar. You want a low tide, ideally one of the bigger spring tides around the new and full moon, which drops the water furthest and exposes the most reef. Aim to arrive as the tide is still falling so you have working time before it turns and starts to cover the bar again. Getting cut off on a rising tide is a real risk on soft, sticky ground, so always know your tide times and your exit route before you go out.
Seasonally, the old advice about "months with an R" (roughly the cooler autumn-to-spring stretch) still has value, and not only for taste. Warm summer water is when spawning softens the meat and, far more importantly, when bacteria such as Vibrio and harmful algal blooms are most likely. Cooler months tend to mean firmer oysters and lower biological risk - but "tend to" is not a guarantee, and it never replaces checking the official status of the exact water you are standing in.
How to gather them
The method is simple, which is part of the charm. At low tide, walk the exposed reef and look for oysters growing as singles or in small clusters. Reach down, and either twist a single oyster free by hand or work a blunt tool under a clump and lever it up. In some areas people use long-handled oyster tongs to reach oysters in slightly deeper water off the edge of the bar, scissoring the rakes together to lift a clump, but for beginners on an exposed reef, hand-picking is all you need.
Cull as you go. Keep oysters that are of legal, sensible eating size and leave the small ones attached to the reef so they can grow on and spawn. Break clusters apart and return the undersized shells and the empty "cultch" to the bar, because that shell is exactly what young oysters need to settle on. Never lever out the base of the reef or strip a patch bare - take a scatter of good singles across a wide area and move on.
Rinse your keepers in clean seawater to knock off mud, and keep them cool, damp and out of the sun. A bucket with a damp cloth over the top, or a mesh bag kept shaded, works well. Live oysters should stay closed or close slowly when tapped; keep them alive and cold until you get home. Sturdy waterproof gloves are essential from the very first oyster, because the shells are razor-sharp and reef edges will open a hand quickly. Good boots or wading shoes save your feet on the same shells.
Handling, cleaning and cooking
At home, scrub each oyster under cold running water to remove grit and mud from the shell. Discard any that are gaping open and will not close, any with cracked or badly damaged shells, and any that smell off - a live, healthy oyster smells clean and of the sea, not sour. Keep the survivors cold, covered with a damp cloth in the fridge (never sealed in water or an airtight bag, which suffocates them), and eat them as soon as you reasonably can.
Shucking is a skill worth learning properly. Hold the oyster cupped-side down in a thick glove or folded towel, find the hinge at the pointed end, and work the tip of a proper oyster knife into it. Twist to pop the hinge, then slide the blade along the top shell to cut the muscle and lift the lid, keeping the "liquor" in the deeper bottom shell. Never force a kitchen knife with your bare hand wrapped around it; oyster-shucking injuries are common and entirely avoidable with a real oyster knife and a glove.
From there it is up to you and, crucially, to the safety guidance below. Grilled or baked on the half-shell over coals, they plump and take on smoke beautifully; battered and fried, or simmered into a chowder, they are rich and satisfying. Raw on the half-shell with a squeeze of lemon is the classic - but raw is also the highest-risk way to eat any wild oyster, so read the next section before you choose it. For cooking ideas that carry over from shore to kitchen, see the catch and cook guide.
Safety and the law
This is the part that matters more than everything above put together. Oysters are among the most dangerous shellfish to gather, because as filter feeders they pump enormous volumes of water through their bodies and concentrate whatever is in it. That includes bacteria such as Vibrio, which thrives in warm months and can cause severe, occasionally life-threatening illness, and biotoxins from harmful algal blooms - the "red tide" family that causes paralytic shellfish poisoning (PSP). These concentrate silently: a contaminated oyster looks, smells and tastes completely normal.
Only ever harvest from waters that are officially open and classified as approved for shellfish by the relevant authority, and check the status every single time before you go - not once a season, every time. Classifications open and close with rainfall, sewage overflows, algal blooms and water temperature, so a reef that was safe last week can be closed today. Learn how to check your local shellfish sanitation programme or fisheries body, and if you cannot confirm the water is open, do not gather there. Never take oysters from near storm drains, marinas, sewage outfalls or after heavy rain.
Understand what cooking can and cannot do. Thorough cooking kills bacteria such as Vibrio, which is exactly why "when in doubt, cook" is the honest rule for any oyster from warmer water. But cooking does not destroy the biotoxins responsible for PSP - no amount of heat, freezing or lemon juice makes a biotoxic oyster safe. That is why the official open/closed status, which accounts for blooms, is the only real protection, and why raw oysters from warm or closed water can be genuinely dangerous. If you have any doubt at all, cook them; if the doubt is about a bloom or a closure, do not eat them at all.
Finally, the ordinary rules. Most places require a recreational shellfish licence or permit, set size limits and daily bag limits, and restrict which reefs and seasons are open, so confirm the regulations for your exact location before you gather. Wear cut-resistant gloves throughout, watch the rising tide and your footing on soft ground, and never harvest more than you will use. For the full breakdown of biotoxins, bacteria, closures and how to check advisories, read the dedicated shellfish safety guide, and pick up cut-resistant gloves, a proper oyster knife and wading footwear from the gear page before your first outing.